What Does Tile Installation San Antonio Mean?
Table of ContentsThe Facts About Tile Installation San Antonio RevealedSome Known Facts About Tile Installation San Antonio.Our Tile Installation San Antonio IdeasAll about Tile Installation San AntonioThe Basic Principles Of Tile Installation San Antonio The Greatest Guide To Tile Installation San Antonio
When you've finished laying ceramic tile, let the thinset dry for 24-hour prior to grouting.Prepare your space for grouting by wiping any type of excess thinset eject and also in grout joints. An energy knife works the ideal to clean out the cement joints. Make certain to swap out your water container routinely, deal with clean water and make use of a practically completely dry sponge. tile installation san antonio. Then, remove your spacers.
Have a pail of water and also a sponge on hand to clean as you go. Start applying your grout with a grout float. A cement float is a flat rubber or silicone tool with a versatile edge, comparable to a spatula. Hold it at a 45 angle while also coming with your cement line diagonally.
All About Tile Installation San Antonio
We like to recommend rotating grouting as well as cleaning up and switching back and also forth every 1030 mins depending on the type of grout, temperature level as well as various other elements. Be careful not to make use of too much water when cleansing up as it can seep the pigment out of the grout and also lighten the color.
It is simpler to use cement only to the joints of a large-format floor tile whereas a small mosaic will require to be nearly completely covered to fill out all of the joints. Once you are ended up grouting, it is likely that a grout haze will create on the surface of the tiles.
Let the cement set up for a couple of hrs, and after that make use of a suggested cement haze remover and a dry or nearly completely dry sponge or rag. Come at the grout line at a diagonal to stay clear of removing cement from the joint.
The Definitive Guide to Tile Installation San Antonio
When your floor tile floor is complete, it's time to apply the cement. Cement fills up the spaces between the floor tiles. Like paint, cement can be available in a range of color options that match or complement your floor tile. Prior to grouting, eliminate all your tile spacers. Leaving the spacers in position and also grouting over them will certainly compromise the honesty of the cement.
Mix grout according to package directions. After the cement is all set, spread it in sweeping arcs with the rubber cement float held at a superficial angle. Apply at a 45-degree angle to the areas in between tiles to stop the float from pressing into the rooms as well as developing irregular grout surfaces.
All About Tile Installation San Antonio
Nearly all concrete grouts have latex polymer in the powder mix. Others require a latex polymer admixture. For joints 1/8-inch to 1/2-inch, make use of sanded cement. For joints approximately 1/8-inch, use non-sanded cement. Adhere to the floor tile maker's recommendations. If there are voids between the ceramic tile and the wall surface, make sure to fill the area with caulk to keep water from getting under the floor tile or right into the wall.
It index additionally won't break as well as can be replaced easily. While you can likewise fill up the voids with mortar or cement, it is not as adaptable, waterproof or easy to fix as caulk.
3 out of 5Moderate, Laying floor tile can be tough on the knees and back $4 to $8 ordinary rate per square read here foot, Joe Ferrante has been laying tile for 30 yearsmany of them for This Old Houseand besides this time around, he's still enamored with the material - tile installation san antonio. "I like ceramic tile," he claims.
Tile Installation San Antonio Things To Know Before You Buy
Illustration by Gregory Nemec Strive for a format that makes best use of the variety of whole tiles and also the size of any kind of cut floor tiles. When awkwardly sized ceramic tiles can't be stayed clear of, put them where vanities will certainly cover them later on or out of the main view lines from the doorway. You shouldn't step on any kind of floor tiles up until the thinset has healed for at the very least 24 hours.
The line crossing at the area's facility are the beginning factor of the floor tile. Lay a row of ceramic tiles along a straightedge extra than halfway throughout the area.

The 30-Second Trick For Tile Installation San Antonio
:max_bytes(150000):strip_icc()/how-to-install-ceramic-wall-tile-1824817-hero-7225f2fef8ec4499b25825c5d56a0cf3.jpg)
After readjusting the A-to-B line, mark the center tile where it touches the chalk line between the various other walls (call them C as well as D). Straighten these marks with the C-to-D chalk line. Repeat the measuring and adjusting process for walls C and D. Lay a straightedge parallel to the C-to-D line and against one side of the facility floor tile.
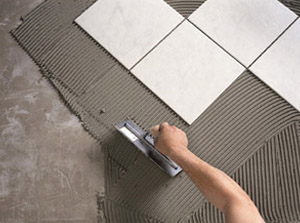
Mix just as much thinset as you can use in 2 hrs. With the level side of a trowel, spread out a slim layer of thinset (scrape layer) over a 2-by-3-foot area alongside the straightedge. Prior to the scratch layer dries out, use more thinset making use of the notched side of the trowel.